Best way to check without clicking
So a friend recently told me that they got a verification email from Apple stating that a new email address had been added to their Apple ID. The person knew that they didn’t add any email address and when they logged into their Apple account, no other email other than their own was showing up.
The friend wanted to know whether this was a phishing email or was it legitimate, but sent to them incorrectly by Apple? Well, it ended up being a fake email that was trying to get the user to click on a link so that they would enter their Apple ID credentials. Luckily, the friend didn’t click the link, but instead opened his browser and typed in iCloud.com and logged in that way.
Even though this friend received a phishing email, not all verification emails are fake. In this article, I’ll show you how you can tell whether the email is fake or not and the best practice for checking your account if you’re not sure.
Verification Emails
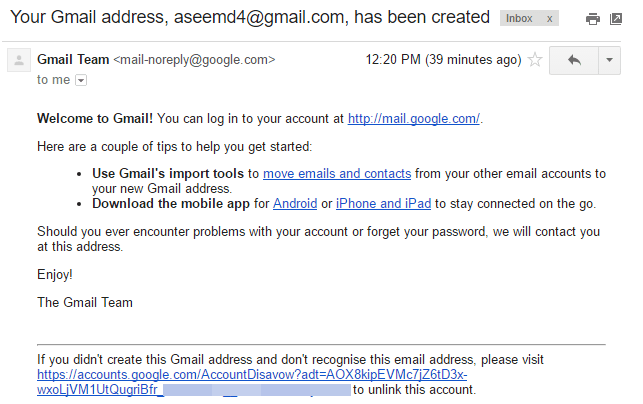
Even though I’m an IT guy and overall computer geek, I still get spoofed by some emails myself. For example, the first time I got this email from Google, I was worried someone was trying to hack into my account.
The wording of this email makes it sound like someone created a new email account and somehow linked it to my account. Could they then try to recover my password and get it sent to this new email address? I wasn’t sure, so I clicked on the link at the bottom, which states that if you didn’t create this email address, then you can unlink it from your account.
I probably shouldn’t have clicked the link in the email since I didn’t really know at that moment if it was from Google or not. Luckily for me, it was and the email was harmless. Basically, when someone creates a new Gmail account, they have to add a recovery email address, which sometimes gets mistyped and hence sent to the wrong person. In any case, you do have to be vigilant before clicking on any link in these types of emails.
How to Check if an Email is Authentic
In order to verify an email as authentic, you have to look at the sending email address and also the email header to be really safe. The ability to distinguish between a real email and a fake one also depends on your email client. I’ll explain further below.
For example, in the above screenshot, you can see that the email was sent from mail-noreply@google.com. This should confirm that the email is really from Google, correct? Well, it depends. If someone sets up a rogue email server, they can send a fake email that can show the sending address as whatever@google.com. Even though they can fake this aspect, the rest cannot be faked.
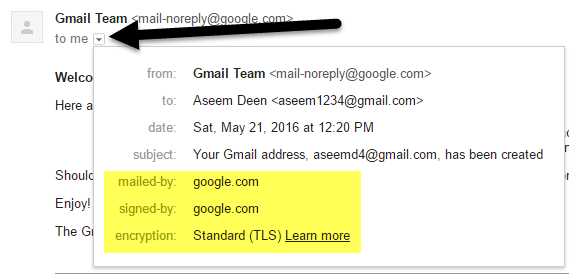
So how do you verify that an email is actually being sent from the real source and not someone else? In simple terms, you check the email header. This is also where the email client comes into play. If you are using Gmail, you can verify the source very quickly by simply clicking on the Show Details arrow directly below the name of the sender.
The important sections are mailed- by, signed-by and encryption. Since it says google.com for both of these fields, the email is truly from Google. For any email that claims to come from a bank or big company, it should always have the mailed-by and signed-by fields. A visible mailed-by field means that email was SPF-authenticated. A visible signed-by field means the email was DKIM-signed. Lastly, the email will almost always be encrypted if sent from a major bank or company.
Even though these fields ensure the email was verified, you need to make sure it was verified by the same company supposedly sending it. For example, since this email is from Google, it should say google.com for the two fields, which it does. Some spammers have gotten smart and sign and verify their own emails, but it won’t match the actual company. Let’s take a look at an example:
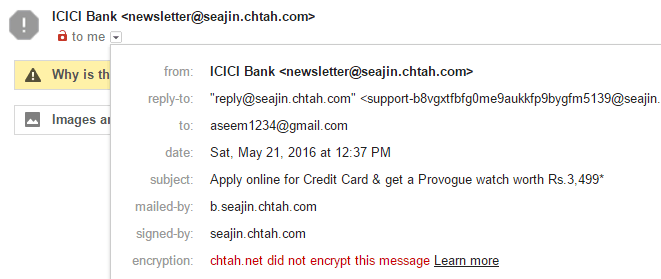
As you can see, this email is supposedly from ICICI bank, but the email address automatically casts doubt on the authenticity of the email. Instead of anything related to the bank name, the domain is seajin.chtah.com, which is very spammy sounding. The email does have the mailed-by and signed-by fields, but again, it’s not the bank domain. Lastly, there is no encryption on the email, which is very shady again.
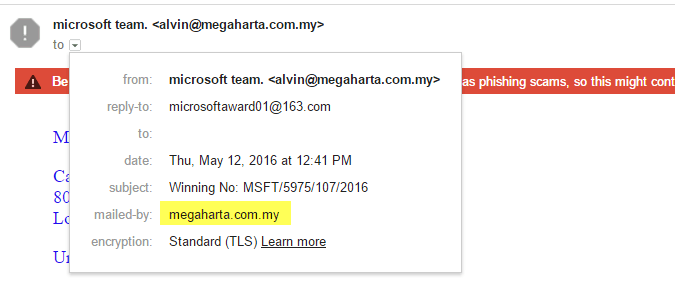
Here’s another email where there is a mailed by field and it was encrypted, but is certainly not from Microsoft. As you can see, the domain is not Microsoft.com, but some unheard of domain. When verifying emails, always check that the sending email address is from the company you believe it is from, i.e. whatever@paypal.com and that mailed-by and signed-by are from the latter part of the email address, i.e. paypal.com.
Let’s look at one more example, which can be a little confusing.
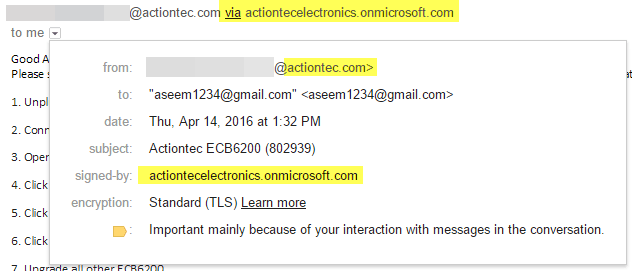
Here, I have an email from a company called Actiontec, but it is VIA actiontecelectronics.onmicrosoft.com. It’s also signed by actiontecelectronics.onmicrosoft.com and has been encrypted. In this case, it means that the email is being sent by a third-party email service, which can’t necessarily be authenticated. In this case, the company is using Office 365 for their company email and that’s why it’s being sent from that domain.
Even though the above email is legitimate, the information in the header does not guarantee that the email is safe. You best option here is to make sure the third-party email service is also a large reputable company. In this case, it’s from Microsoft. Lastly, if someone is really trying to fake another email address, Google will probably be able to tell and give you a warning like this:
Or something like this:
If you ever get any of these warnings, then you shouldn’t trust the emails at all. You might be wondering what to do if you’re not using Gmail and if you’re not looking at the email in the web browser? Well, in those cases, you have to view the full email header. Just Google your email provider name followed by “view email header“. For example, Google Outlook 2016 view email header to get instructions for that client.
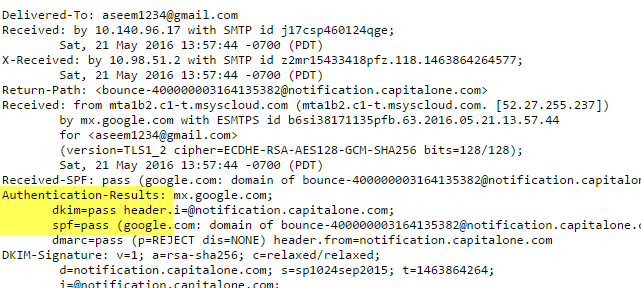
Once you do that, you want to search for the following pieces of text under the heading Authentication Results:
spf=pass
dkim=pass
The spf line is equivalent to the mailed-by field in Gmail and dkim is equivalent to signed-by. It should look something like this:
Again, even if both items have PASS, you need to make sure it’s for the real domain, not the fake one the spammer may be using. If you want to read more about email authentication in Gmail, check out these links below:
https://support.google.com/mail/answer/180707?hl=en
https://support.google.com/mail/troubleshooter/2411000?hl=en&ref_topic=3395029
https://support.google.com/mail/answer/1311182?hl=en
After testing multiple services, it’s also the reason why I stick with Gmail over other email clients and why I specifically use the web interface because it provides many more layers of protection that you otherwise wouldn’t get.
Lastly, you should make it a habit of going to the browser and manually visiting a website rather than clicking on the link in the email. Even if you know the email is safe, it’s a sure-fire way of knowing you’re not visiting some spoof website. If there is a link in an email that must be clicked, make sure to check the URL in the address bar of your browser before you enter any login details or other sensitive information. If you have any questions, feel free to comment. Enjoy!

